例:クラウド・プロバイダに手動インストール
クラウド・プロバイダ上にサーバを持っている場合は、そこに Docker Engine を直接インストールできます。以下の例は Amazon Web Services (AWS) EC2 インスタンスを作成し、そこに Docker Engine をインストールします。
他のクラウド・プロバイダ上でも、このページと同様の手法で Docker 対応ホストを作成できます。
ステップ1:AWS にサインアップ
- AWS ユーザでなければ、 AWS にサインアップしてアカウントを作成し、EC2 クラウド・コンピュータに対する管理者権限(root)を準備します。Amazon アカウントを登録したら、そのアカウントの管理者権限を使います。
- IAM (Identity and Access Management)管理者ユーザ、管理者グループ、リージョンに関連づけるキーペアを作成します。
AWS 上のメニューから、 サービス > IAM を選びます。
AWS のドキュメント Amazon EC2 でのセットアップ をご覧ください。この中にある「2. IAM ユーザーを作成する」と「3. キーペアを作成する」の各手順を進めます。
これから AWS や EC2 を始める場合は、VPC (Virtual Private Cloud) 作成やサブネット指定は要りません。新しい EC2-VPC プラットフォーム(2013年12月04日以降に作成)の場合は、アベイラビリティ・ゾーンごとにデフォルトの VPC とサブネットが作成されています。インスタンスを起動すると、自動的にデフォルトの VPC が使われます。
ステップ2:EC2 インスタンスの設定と起動
以下の手順では、オペレーティング・システム(OS)を指定して仮想マシン(VM)を作成してから、インスタンスを起動します。
- IAM ユーザの認証情報で AWS にログインします。

Amazon 用語では、AWS EC2 仮想サーバを インスタンス(instance) と呼びます。アカウント、IAM ユーザとキーペアのセットアップを終え、インスタンスの起動準備が整いました。次は仮想マシン上の OS を選択します。
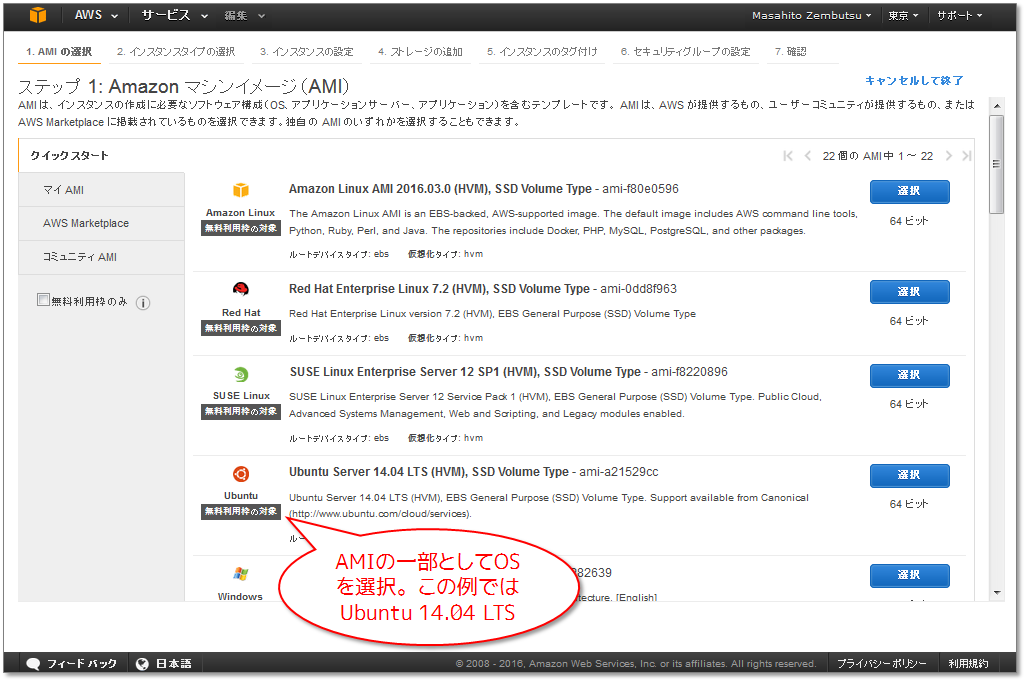
- Amazon マシン・イメージ(AMI)で OS とアプリケーションを選びます。今回の例では Ubuntu Server を選びます。

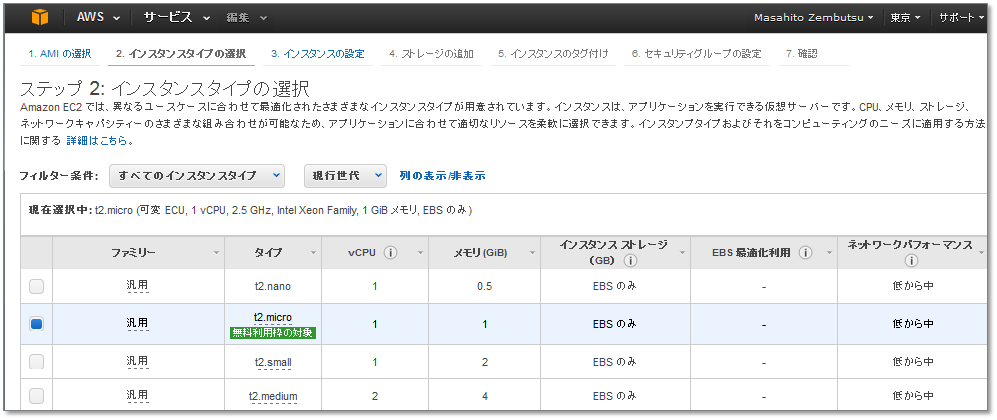
- インスタンス・タイプを選択します。

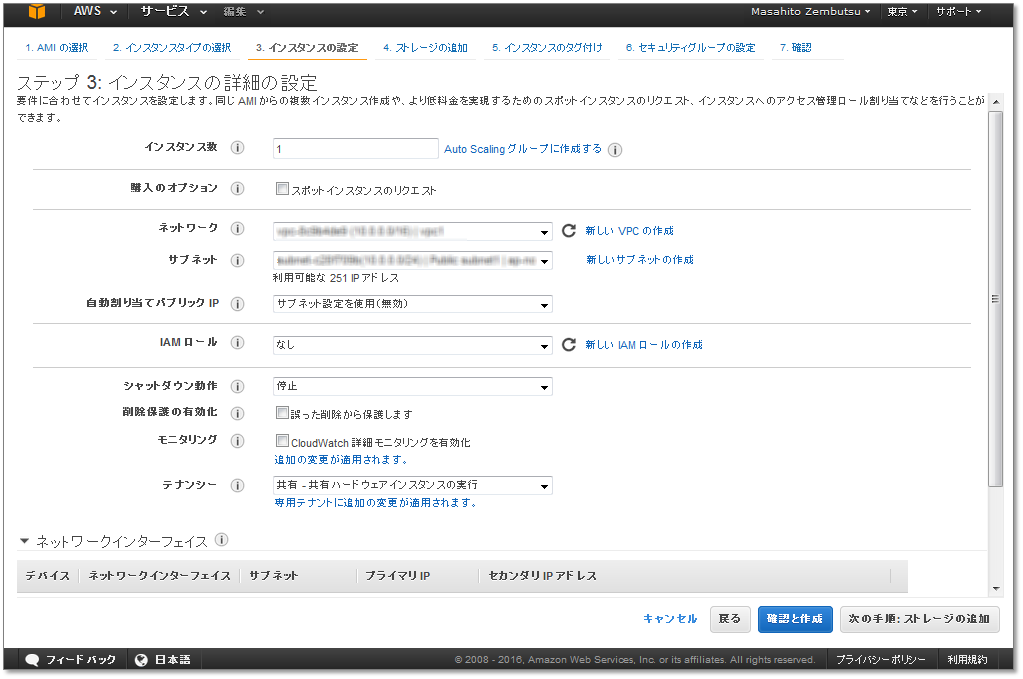
- インスタンスの設定をします。
リージョンやアベイラビリティ・ゾーンと実際にリンクするデフォルト・ネットワークとサブネットを選びます。

- 確認と作成 をクリックします。
- このインスタンスで使用するキーペアを選びます。
作成する前に使用するキーペアを選ぶ必要があります。次のステップで使うための .pem ファイルを持っている必要があります。
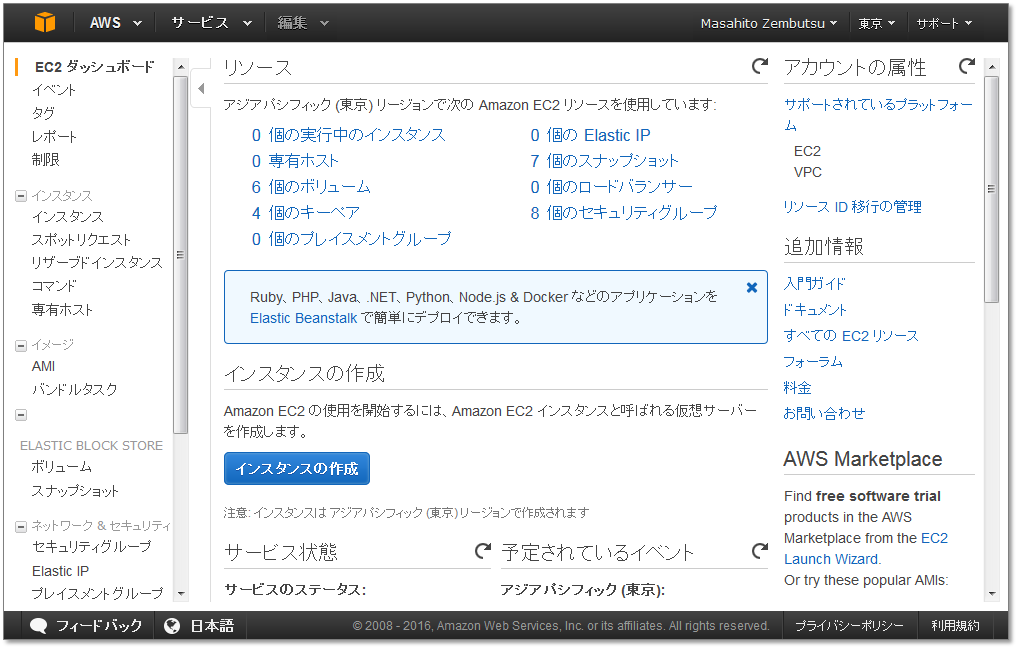
これでインスタンスが起動し、実行中になりました。AWS の EC2 インスタンスのメニューで確認するには EC2 (クラウド内の仮想サーバー) > EC2 ダッシュボード > リソース > 実行中のインスタンス を選びます。
AWS インスタンス・ダッシュボード上の 接続 ボタンをクリックすると、プライベート・キーファイル、インスタンス IP アドレス、SSH でログインするための情報が表示されます。
ステップ3:ターミナルからログインし、aptの設定と、パッケージ取得
- コマンドライン上のターミナル(端末)から EC2 インスタンスにログインします。
SSH キーを保存しているディレクトリに移動し、次のコマンドを実行します(あるいは、コマンド中でキーのパスを指定します)。
$ ssh -i "自分のSSH鍵" ubuntu@xx.xxx.xxx.xxx
実行例:
$ cd ~/Desktop/keys/amazon_ec2
$ ssh -i "my-key-pair.pem" ubuntu@xx.xxx.xxx.xxx
Ubuntu の Docker インストール方法は http://docs.docker.jp/engine/installation/linux/ubuntulinux.html に従います。以下のステップでは、こちらに記載されている手順を繰り返します。
- カーネルのバージョンが 3.10 以上であることを確認します。
ubuntu@ip-xxx-xx-x-xxx:~$ uname -r
3.13.0-48-generic
- 新しい
gpgキーを追加します。
ubuntu@ip-xxx-xx-x-xxx:~$ sudo apt-key adv --keyserver hkp://p80.pool.sks-keyservers.net:80 --recv-keys 58118E89F3A912897C070ADBF76221572C52609D
Executing: gpg --ignore-time-conflict --no-options --no-default-keyring --homedir /tmp/tmp.jNZLKNnKte --no-auto-check-trustdb --trust-model always --keyring /etc/apt/trusted.gpg --primary-keyring /etc/apt/trusted.gpg --keyserver hkp://p80.pool.sks-keyservers.net:80 --recv-keys 58118E89F3A912897C070ADBF76221572C52609D
gpg: requesting key 2C52609D from hkp server p80.pool.sks-keyservers.net
gpg: key 2C52609D: public key "Docker Release Tool (releasedocker) <docker@docker.com>" imported
gpg: Total number processed: 1
gpg:               imported: 1  (RSA: 1)
docker.listファイルを作成し、今回の OS 、Ubuntu Trusty 14.04 (LTS) のエントリを追加します。
ubuntu@ip-xxx-xx-x-xxx:~$ sudo vi /etc/apt/sources.list.d/docker.list
既にファイルが存在している場合は、内容を消さずに更新します。
aptパッケージのインデックスを更新します。
ubuntu@ip-xxx-xx-x-xxx:~$ sudo apt-get update
- 古いリポジトリが存在している場合はパージします。
今回の例では新しい仮想マシンを実行したので、このような作業を行う必要はありません。ですが、念のために確認してみましょう。
ubuntu@ip-xxx-xx-x-xxx:~$ sudo apt-get purge lxc-docker
Reading package lists... Done
Building dependency tree
Reading state information... Done
Package 'lxc-docker' is not installed, so not removed
0 upgraded, 0 newly installed, 0 to remove and 139 not upgraded.
- 適切なリポジトリから
aptで取得できることを確認します。
ubuntu@ip-172-31-0-151:~$ sudo apt-cache policy docker-engine
docker-engine:
Installed: (none)
Candidate: 1.9.1-0~trusty
Version table:
1.9.1-0~trusty 0
500 https://apt.dockerproject.org/repo/ ubuntu-trusty/main amd64 Packages
1.9.0-0~trusty 0
500 https://apt.dockerproject.org/repo/ ubuntu-trusty/main amd64 Packages
    . . .
apt-get update や apt を実行すると、新しいリポジトリから取得します。
ステップ4:OS 用の推奨環境をインストール
Ubuntu Trusty (と古いバージョンのいくつか)では linux-image-extra カーネル・パッケージのインストールが推奨されています。これは aufs ストレージ・ドライバを使えるようにします。インストールは次のように実行します。
ubuntu@ip-xxx-xx-x-xxx:~$ sudo apt-get update
ubuntu@ip-172-31-0-151:~$ sudo apt-get install linux-image-extra-$(uname -r)
ステップ5:Docker Engine をリモート・インスタンス上にインストール
- パッケージのインデックスを更新します。
ubuntu@ip-xxx-xx-x-xxx:~$ sudo apt-get update
- Docker Engine をインストールします。
ubuntu@ip-xxx-xx-x-xxx:~$ sudo apt-get install docker-engine
Reading package lists... Done
Building dependency tree
Reading state information... Done
The following extra packages will be installed:
aufs-tools cgroup-lite git git-man liberror-perl
Suggested packages:
git-daemon-run git-daemon-sysvinit git-doc git-el git-email git-gui gitk
gitweb git-arch git-bzr git-cvs git-mediawiki git-svn
The following NEW packages will be installed:
aufs-tools cgroup-lite docker-engine git git-man liberror-perl
0 upgraded, 6 newly installed, 0 to remove and 139 not upgraded.
Need to get 11.0 MB of archives.
After this operation, 60.3 MB of additional disk space will be used.
Do you want to continue? [Y/n] y
Get:1 http://us-west-1.ec2.archive.ubuntu.com/ubuntu/ trusty/universe aufs-tools amd64 1:3.2+20130722-1.1 [92.3 kB]
Get:2 http://us-west-1.ec2.archive.ubuntu.com/ubuntu/ trusty/main liberror-perl all 0.17-1.1 [21.1 kB]
. . .
- Docker デーモンを起動します。
ubuntu@ip-xxx-xx-x-xxx:~$ sudo service docker start
docker run hello-worldを実行し、Docker Engine が正常にインストールされていることを確認します。
ubuntu@ip-xxx-xx-x-xxx:~$ sudo docker run hello-world
ubuntu@ip-172-31-0-151:~$ sudo docker run hello-world
Unable to find image 'hello-world:latest' locally
latest: Pulling from library/hello-world
b901d36b6f2f: Pull complete
0a6ba66e537a: Pull complete
Digest: sha256:8be990ef2aeb16dbcb9271ddfe2610fa6658d13f6dfb8bc72074cc1ca36966a7
Status: Downloaded newer image for hello-world:latest

Hello from Docker.
This message shows that your installation appears to be working correctly.

To generate this message, Docker took the following steps:
1. The Docker client contacted the Docker daemon.
2. The Docker daemon pulled the "hello-world" image from the Docker Hub.
3. The Docker daemon created a new container from that image which runs the executable that produces the output you are currently reading.
4. The Docker daemon streamed that output to the Docker client, which sent it to your terminal.

To try something more ambitious, you can run an Ubuntu container with:
$ docker run -it ubuntu bash

Share images, automate workflows, and more with a free Docker Hub account:
https://hub.docker.com

For more examples and ideas, visit:
https://docs.docker.com/userguide/
次はどこへ行きますか
Docker をクラウド上でより簡単に、かつ、複数のホストを自動構築する方法をお探しですか。 Docker Machine を使えばホストを自動構築できます。
参考
- Example: Manual install on cloud provider
- https://docs.docker.com/engine/installation/cloud/cloud-ex-aws/